The cultivation of vegetables in greenhouses and hotbeds in summer cottages significantly increases the chances of getting stable and high yields, and at any time of the year. Today, the market provides a huge selection of greenhouse constructions of various sizes and shapes for every taste and budget. However, in the article we will consider the option of self-construction of a new generation structure - a thermos greenhouse.
What is a greenhouse thermos
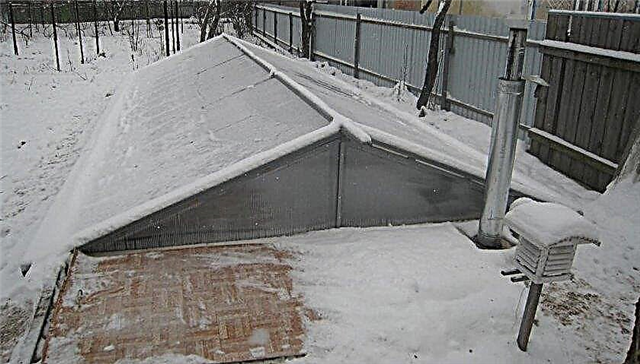
The structure under consideration is a structure made of a frame and polycarbonate, the walls of which are deepened into the ground, and on the surface there is only a gable or gable roof. In such buildings, it is possible to achieve a year-round temperature that does not fall below 0 °, which allows cultivating plants that grow only with sufficient light and heat throughout the year. At the same time, neither additional heating nor insulation for the construction is required.
The author of a unique energy-saving technology is a resident of Ukraine Anatoly Patiy. It was he who first managed to build a thermos greenhouse.Did you know? The largest greenhouse in the world is located in the county of Cornwall (UK). It consists of 2 rooms and several domes with different climatic zones. About 1 million plants from all over the world grow in them.
Maintenance of heat in the building is achieved thanks to a special system of reflection of sunlight that is converted into heat, isolation from exposure to cold soil and air, and 2–2.5 m deep into the ground, where a stable positive temperature regime is almost always maintained. The light transmission is 91%. The inner walls are sheathed with reflective foil, which allows to save heat and increase the area of lighting.
Advantages and disadvantages of the greenhouse
- When using a greenhouse thermos, the following advantages can be distinguished:
- You can get a crop year-round, including heat and light-loving crops.
- It is possible to cultivate various types of plants (including exotic ones), seedlings, flowers, mushrooms.
- Light and heat are distributed evenly, which contributes to obtaining high yields, 2-3 times higher than in ordinary greenhouse buildings.
- It is not required to additionally install lighting, heating and insulation.
- The frame has high strength and resistance to negative environmental effects - temperature extremes, heavy rainfall, wind gusts.
- A person needs only minimal maintenance and care efforts.
- Allows you to significantly save heat and energy.
- Reducing the risk of plant infection by diseases and harmful insects, as contacts with the environment are minimized.
- It can be used for a long time without repair.
- There are also disadvantages to building a greenhouse using this technology:
- Significant investment in the construction.
- The complexity of the work, which requires the involvement of equipment and crews.
How to make a do-it-yourself thermos greenhouse
It is not possible to build a thermos greenhouse quickly - in 1-2 days, like a regular polycarbonate building, it will not succeed. It will take weeks, or even months. The foundation pit must be dug using heavy equipment.
Step-by-step instruction
In order to properly build an energy-saving buried structure, the following steps must be taken:
- Choose a suitable site.
- Calculate the size.
- Sketch a drawing.
- Calculate the amount of materials and tools required.
- Equip the foundation.
- Install the walls and roof frame.
- Sheathe the roof with polycarbonate.
Calculation of materials and tools
The amount of materials will depend on the size of the structure. It can be built with different lengths and no more than 5 m wide. Energy efficiency and light reflection in buildings whose width exceeds this indicator will be lower.
For the construction of a thermos greenhouse, the following materials will be required:
- wooden bars;
- cellular polycarbonate;
- metal profiles, corners;
- fasteners (galvanized self-tapping screws, thermowells, nuts);
- polystyrene foam;
- thermal blocks;
- reflective foil;
- cement;
- sand;
- crushed stone.
- jigsaw;
- bayonet and shovel;
- concrete mixers;
- a hammer;
- pliers;
- screwdriver (screwdriver);
- trowel;
- roulettes;
- building level.

Choosing a place and arranging a pit
To build a greenhouse, you should choose a site well lit by the rays of the sun, where the shadow from neighboring buildings does not fall. The sun should warm it all day long. The recommended location of the greenhouse is from east to west in length.
The foundation pit should have a minimum depth of 2 m and a rectangular shape. The walls in it should be flat.
Important! The site should first be examined for the proximity of groundwater, the possibility of flooding in the spring.
Foundation building
The foundation can be made from a monolithic concrete slab or from concrete blocks. In the latter case, you will also need to use construction equipment. Before making the foundation, you should consider the heating system of the greenhouse - if you plan a warm floor, you need to carry out the supply of communications.
To fill the slab you need:
- Pour sand to the bottom. Tamp to a 5 cm layer.
- Make the formwork. The sides of the board should be 3-5 cm higher than the foundation.
- Install reinforcement in 10 × 10 cm increments.
- Knead the concrete mix.
- Pour the mixture by filling all parts of the formwork.
- Seal the fill.
- Install the fasteners for the frame.
- Cover with plastic wrap.
- The greenhouse construction can be erected a month later.
Important! Concrete mixture pouring must be carried out strictly in one day. If you take breaks, then cracks may appear in the future.
If a block base is planned, then you need:
- Dig a moat 25 cm wide.
- Pour around the perimeter a layer of gravel 10 cm high.
- Knead concrete solution.
- Pour it onto gravel.
- At first, in the corners, and then around the perimeter, insert blocks into the solution.
- Pour the resulting empty spaces with a solution.
- Level the surface until smooth.
- Lay out 5 rows of bricks, starting from the corners.
- After setting, grout the joints.

Strip concrete foundation is made in this way:
- To formwork.
- Fill the formwork with concrete. If necessary, strengthen it with supports.
- Pour a 20-centimeter layer of sand or a 10-centimeter layer of gravel to the bottom.
- Tamp tightly.
- Lay the reinforcing cage of 4-6 rods.
- Knead the concrete solution by mixing cement (1 part), fine gravel (3 parts), river sand (3 parts).
- Pour the solution into the tape.
- Make rebar protrusions.
Important! When making the foundation, it is necessary to leave a doorway so that the owner can get inside the greenhouse.
We make walls and insulation
After the concrete has hardened, proceed with the installation of the walls. Walls can be made of brick, cinder block, thermal blocks, or simply filled with concrete using formwork. Thermoblocks need to be stacked on top of each other by threading metal profiles through them and pouring concrete. They are attached to the foundation using a metal frame.
The walls should protrude from the ground by at least 50 cm. Inside, they should be sheathed with a thermal insulation film, foil-coated thermal film. It is advisable to lay the thermal protective material in 2 layers.

Building a roof
A roof made of metal or wood will be required for the roof. The second option is to make it cheaper and easier. It is necessary to prepare wooden rafters and strapping bars with a section of 30 × 50 mm, a beam of 70 × 70, ridge boards 20 × 170 mm. All wooden parts must be treated with special preparations to prevent decay.
Rafters need to be interconnected. In order for them to be stable, it is necessary to fix them with jumpers. Under the rafters you need to attach a skate. Install supports under the skate. Then paint the wood elements.
Polycarbonate lining
Next, fix the polycarbonate on the roof. This is done with the help of galvanized screws and thermowells. Polycarbonate is attached with a protective ultraviolet layer to the outside. Often you can find recommendations for attaching a double layer of polycarbonate with a thickness of 4 mm, separated by a special gasket. Joints must be sealed with transparent tape.
Did you know? The first major structure for the construction of which forged steel was first used is the Palm Greenhouse or Palm House (UK). It was built in 1844–48. It contains 70% of all palm trees known to scientists.
Features of arranging a thermos greenhouse
The arrangement inside the greenhouse building by the type of thermos is not much different from an ordinary greenhouse:
- It is necessary to carry out lighting, additional heating (if required) and an automatic irrigation system. Tanks with warm water are used as simple heating. It is also possible to lay underfloor heating.
- Inside, all joints must be well sealed with plaster or foam.
- To cultivate plants equip racks made of wood or metal. They are placed in several tiers. The most photophilous cultures are planted on the upper racks.
- It is also possible to cultivate plants on high beds filled with fertile soil.
So, a thermos greenhouse is the best winter option for building on a summer cottage with the aim of growing various crops throughout the year. Despite the significant costs of materials and construction, it is able to last a long time and save the owner from such events as installing lighting, heating, insulation and temperature control of the required level.


